Futsal court size: Official dimensions and layout guide
Learn the official futsal court size, including dimensions for professional, amateur, and youth games. Get a clear layout guide for indoor futsal courts.
Step onto a futsal court and you feel the speed right away: tight passes, quick turns, and shots that leave little room for error. That energy depends on precise playing space. Get the dimensions wrong, and the game changes.
Futsal is a five-a-side form of indoor soccer governed by FIFA and the AMF. Each body lays out strict rules for court length, width, run-off zones, and goal size.
Facilities must follow these standards to host sanctioned matches, protect players, and keep insurance costs in check. Yet online advice often mixes gym-class “mini-soccer” layouts with official specs, leaving coaches, school admins, and builders confused.
This guide clears the fog. You’ll learn:
- The exact official futsal court size for international and domestic play, in meters and feet.
- How every line (from the penalty spot to substitution zone) shapes tactics and safety.
- Key layout extras like surface choice, lighting, and runoff space that inspectors look for.
By the end, you’ll know the numbers to hand your contractor, the markings to verify with a measuring tape, and the best practices that keep games flowing smoothly.
.jpg)
Source: Bayu Syaits on Unsplash
1. Governing bodies & rulebooks explained
Before you paint a single line, confirm which rulebook your facility must follow. Two organisations publish the measurements used in virtually every sanctioned futsal match.
FIFA (Fédération Internationale de Football Association)
- Rulebook: Futsal Laws of the Game
- Coverage: National federations, international tournaments, most youth and school leagues around the world
AMF (Asociación Mundial de Futsal)
- Rulebook: Official Rules of Indoor Soccer/Futsal
- Coverage: Selected professional and amateur leagues in South America, parts of Europe, and a handful of regional competitions
Quick check: If your venue sits in Asia, Europe, or North America, local associations almost always require the FIFA standard. Still, confirm with your federation before ordering floor graphics.
Key differences you should know:
1. Court size ranges
- FIFA (international): 38–42 m long × 20–25 m wide
- FIFA (domestic or local): 25–42 m long × 16–25 m wide
- AMF: 38–42 m long × 18–22 m wide
2. Line markings
- FIFA uses a radius-based penalty area (6 m arc plus goal-to-arc side lines).
- AMF specifies a rectangular penalty box that projects 6 m straight out from each goalpost.
3. Second penalty spot
- FIFA: 10 m from the goal line
- AMF: 9 m from the goal line
4. Game ball rebound
Both organisations mandate a size-4 ball, yet AMF allows a slightly higher rebound range, something to remember when you select flooring with the right shock-absorption rating.
How often the rules change
- FIFA reviews its futsal laws every two years, with minor wording tweaks appearing in between cycles.
- AMF tends to publish updates after each World Cup (roughly every four years).
Tip for facility owners: Mark the centre spot, penalty spots, and arc origins with small drilled reference dowels beneath the top surface. When a future rules update shifts a measurement, you can repaint new lines without tearing up the entire floor.
.jpg)
Source: Wikipedia under creative commons licenses
2. Official futsal court dimensions (quick guide)
Building to the correct measurements keeps your venue eligible for tournaments and cuts re-painting costs later. Use the figures below as your master checklist for “official futsal court dimensions” and “futsal court size in meters”.
1. Rectangle length × width
- FIFA international matches: 38 m – 42 m long and 20 m – 25 m wide
- FIFA domestic or local leagues: 25 m – 42 m long and 16 m – 25 m wide
- AMF competitions: 38 m – 42 m long and 18 m – 22 m wide
A 40 m × 20 m court (the figure many arenas choose) sits neatly inside every range above and remains the benchmark for televised events.
2. Run-off safety buffer
Keep at least 2 m of clear space outside each line for domestic play and 3 m for international fixtures to stop collisions with walls or spectator boards
3. Line width & paint
Every boundary and marking line is 8 cm wide and counts as part of the area it encloses
4. Goal frame
- Inside width 3 m, inside height 2 m; post and crossbar depth also 8 cm
- Net depth should reach 80 cm – 100 cm at ground level so the ball cannot rebound dangerously.
5. Centre & penalty reference points
- Centre circle radius: 3 m
- Penalty area: quarter-circles radius 6 m drawn from each post, joined by a 3.16 m line parallel to the goal line
- First penalty mark: 6 m from the midpoint between the posts.
- Second penalty mark: 10 m (FIFA) or 9 m (AMF) from the goal line.
6. Substitution zones
- Mark a 5 m strip in front of each team bench. Each end is shown by an 80 cm stripe, half on the playing surface and half outside
.jpg)
Source: Wikipedia under creative commons licenses
3. Markings & zones: Complete line-by-line breakdown
Precise markings turn a blank rectangle into a certified futsal court. Measure twice, paint once, and use these details as your checklist.
1. Boundary lines and centre circle
- Touchlines and goal lines: Run the full length and width of the court. Each line is 8 cm wide and counts as part of the playing area.
- Halfway line: Splits the court length-wise. Mark the centre spot exactly in the middle.
- Centre circle: Radius 3 m from the centre spot. Players must stay outside this circle at kick-off.
- Corner arcs: Draw a 25 cm quarter-circle from each corner to guide corner kicks.
Tip: Use a snap-line coated with contrasting chalk, then follow with two coats of non-skid polyurethane paint for durability.
2. Penalty areas and penalty marks
- Penalty arc (FIFA): From each goalpost measure 6 m toward the court, plant a nail, attach a string, and scribe a 6 m quarter-circle. Connect the two arcs with a straight 3.16 m line parallel to the goal line.
- Penalty arc (AMF option): Instead of arcs, mark a rectangle that projects 6 m straight out from each post if local rules call for the AMF layout.
- First penalty mark: 6 m from the midpoint between the posts, centred on the goal.
- Second penalty mark: 10 m (FIFA) or 9 m (AMF) straight out from the goal line on the same centre axis.
Tip: Insert small stainless-steel washers flush with the floor at both penalty marks before painting. When lines fade, you will find the exact spot instantly.
3. Substitution zones and team benches
- Location: On the same side as the timekeeper’s table, beginning 5 m from the halfway line and ending 5 m short of the nearest corner.
- Marking: Paint two 80 cm stripes perpendicular to the touchline: 40 cm sits on the court, 40 cm extends into the runoff area. The space between the stripes is the substitution zone.
- Benches: Place team benches at least 2 m behind the touchline to keep staff clear of on-rushing players.
Tip: Lay a contrasting colour for the substitution stripes so referees can spot illegal changes at a glance.
.jpg)
Source: Pascal Swier on Unsplash
4. Goal dimensions and safe placement
Getting the frame right protects players and keeps your court inside the rulebook. Use these numbers and safety checks before you bolt anything to the floor.
1. Official frame size
- Width (inside posts): 3 m | 9 ft 10 in
- Height (inside cross-bar to floor): 2 m | 6 ft 7 in
- Post & cross-bar thickness: 8 cm, matching the width of all court lines
A 3 × 2 m frame is the only size recognised by FIFA and AMF for adult futsal. Order factory-built goals that already meet this spec; trimming or welding after delivery often voids safety certification.
2. Net depth and fit
- Top depth: 80 cm
- Bottom depth: 100 cm
- The deeper base stops fast shots from rebounding into play and leaves space for keepers to recover safely. Choose knotless polypropylene nets treated for UV and abrasion so fibres stay strong on outdoor courts.
Tip: Mark the net straps so game-day crews re-hang at the correct depth every time.
3. Anchoring and anti-tip safety
A stationary goal is non-negotiable. Use one of the anchoring options below and confirm load ratings with your facilities team.
- Outdoor courts: Drill at least two auger-style anchors, one on each side of the base frame. Tighten until the flange sits flush with the shoe plate. Add a third anchor on windy sites.
- Indoor floors: Bolt through factory-cut holes or place four sand- or steel-filled anchor bags (minimum 18 kg / 40 lb each) directly over the back bar.
- Check anchors before every session. A quick tug on the cross-bar should show zero movement.
4. Padding and proximity
- Wrap posts with 40 mm closed-cell foam when youth teams use the court or when walls sit closer than the 3 m international runoff.
- Keep advertising boards at least 1 m behind the net frame so players can dive without impact.
.jpg)
Source: Izuddin Helmi Adnan on Unsplash
5. Flooring & Surface Options
The playing surface does more than hold lines in place. It controls speed, limits injuries, and decides how many hours of open-play your maintenance crew spends with a mop. Pick the right material now and you’ll save on resurfacing fees for years.
1. Hardwood maple (indoor arenas)
- Feel: Fast ball roll, natural shock absorption, classic look for televised events.
- Life span: 25+ years if humidity stays between 35–50 percent.
- Upkeep: Annual screening and recoating, plus sanding every 8–10 years.
- Budget tip: A floating sub-floor with shock-pads can reduce long-term knee injuries without pushing costs off the chart.
2. Poured polyurethane (PU) systems
- Feel: Slightly slower ball speed than wood; consistent traction even when sweat hits the floor.
- Durability: Seamless topcoat shrugs off water bottles and rolled-in basketball hoops. Expect 15–20 years before a full re-pour.
- Maintenance: Re-seal every 5–7 years; spot repairs cure overnight, making downtime short.
- Why choose it? Multi-sport gyms that host futsal tonight and badminton tomorrow love PU’s line-masking layers.
3. Modular polypropylene tiles
- Feel: Snappy bounce on indoor models; outdoor versions include drainage channels so rain doesn’t turn the court into a slip-n-slide.
- Installation: DIY-friendly. Two staff members can click 800 m² together in a weekend.
- Flexibility: Replace a cracked tile in minutes—no sanding, no fumes.
- Best for: Community centres, school halls, or temporary pop-up events that need a “pro” look fast.
Outdoor note: If you’re converting an old tennis court, a thin cushioned-acrylic overlay on post-tensioned concrete gives futsal-ready grip while keeping surface temps cooler than bare asphalt.
Shock absorption & ball-bounce benchmarks
A beautiful floor still fails inspection if it hurts ankles or kills the game’s rhythm. Use these performance targets when comparing quotes:
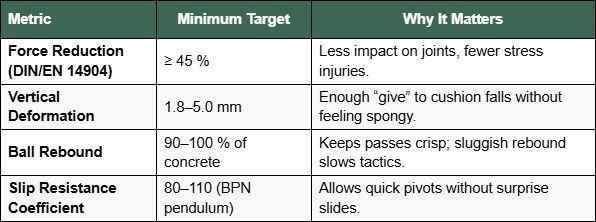
Tip: Ask suppliers for third-party lab reports that list these exact figures. Marketing buzzwords like “ultra-cushion” or “pro-bounce” mean nothing without numbers.
.jpg)
Source: Timothy Tan on Unsplash
6. Indoor vs. outdoor layout considerations
Designing a futsal court for indoor use isn’t the same as building one outside. While the core dimensions stay the same, the real differences lie in materials, environmental control, and long-term wear.
Each setup has unique challenges, and knowing them early helps you avoid costly retrofits later.
Indoor:
1. Ceiling height and clearance
- Minimum height clearance: 7 m (about 23 ft) is the standard for competitive play. This prevents interference with lofted balls and protects lighting or sprinkler systems from impact.
- For training gyms or recreational use, some venues get away with 5 m clearance, but it limits gameplay and eliminates any chance of hosting tournaments.
- Avoid ceiling-mounted basketball hoops or beams that obstruct play, they’re often deal-breakers during inspections.
Tip: Use matte-finish ceiling paint to reduce glare and improve visibility for players and spectators.
2 Lighting & visibility
- Lux levels (brightness):
- 300–500 lux for community use or casual leagues
- 750–1,000 lux for televised matches or pro-level tournaments
- Always go for LED fixtures with anti-glare diffusers and a CRI (Color Rendering Index) above 80. This ensures players can track the ball clearly and spectators see accurate colors.
Tip: Position fixtures to avoid casting shadows over the penalty area and corners, a common problem in low-ceiling gyms.
3. Ventilation, HVAC & indoor comfort
- For indoor venues, good airflow and humidity control are essential, especially with synthetic flooring.
- Use dehumidifiers or integrated HVAC to keep relative humidity between 40–60%. This prevents wood floors from warping and stops PU floors from turning slick.
Warning: Poor ventilation + sweaty floors = slippery court + injury risk. Don’t skip this step.
Outdoor:
1. Outdoor surface & weatherproofing
- Choose UV-resistant, slip-resistant coatings or modular tiles designed for weather exposure. Avoid bare concrete or painted asphalt—they’ll wear out fast under sun and rain.
- Ensure your surface has a 1% slope for water runoff or install perimeter drains to avoid puddles.
- Fencing must be high and sturdy (ideally 3 m or taller) to keep balls in play and protect nearby areas.
2. Wind & environmental barriers
- In windy climates, consider partial enclosures or windbreak panels to avoid disrupted play. Even mild crosswinds can ruin passing accuracy in a futsal match.
- If your site allows, plant hedges or use mesh fencing with wind-dampening fabric for a more natural barrier.
.jpg)
Source: Nish Gupta on Unsplash
7. Planning your court: A step-by-step checklist
Use this roadmap to keep the build on schedule and avoid costly do-overs. Print it, clip it to your clipboard, and tick each box as you go.
Step 1 – Audit the space
- Grab a laser measurer and confirm the clear rectangle you can actually use once walls, pillars, and exits are taken into account.
- Make sure run-off buffers (2 m for local play, 3 m for international) still fit inside the shell.
Step 2 – Snap reference lines
- Mark the true centre of the room, then snap chalk lines for the halfway line, touchlines, and goal lines.
- Drop small masonry nails at the centre spot and penalty spots; they become hidden anchors for future repainting.
Step 3 – Build a rock-solid base
- Indoor courts: lay a damp-proof membrane, followed by a shock-pad or sprung subfloor if you’re using hardwood.
- Outdoor slabs: pour post-tensioned concrete with a 1 percent fall toward drains so puddles never form.
Step 4 – Install the playing surface
- Hardwood: acclimatise planks for 72 hours, then nail or clip according to the supplier’s pattern.
- PU or cushioned acrylic: trowel the base coat, let it cure, then apply colour layers.
- Modular tiles: start from the centre line and work outwards, locking tongues every three tiles to keep rows square.
Step 5 – Paint official markings
- Mask off eight-centimetre stripes with high-tack tape. Work from goal lines outward to keep corners crisp.
- Use two thin coats of polyurethane or epoxy paint instead of one thick layer; the finish lasts longer and stays brighter.
Step 6 – Set goals and padding
- Bolt goal shoes straight into pre-cast anchor sleeves or load each goal with at least 180 kg of counter-weight bags.
- Wrap post padding where youth players train or walls sit closer than the recommended buffer.
Step 7 – Run a full safety inspection
- Walk the lines with a steel tape to verify every dimension matches the rulebook.
- Test lighting lux levels, check air flow (indoor), and pour a bucket of water on one corner (outdoor) to confirm it drains inside five minutes.
- Sign off only after nets, anchors, benches, and substitution zone stripes are in place.
.jpg)
Source: João Pedro Schmitz on Unsplash
8. Common mistakes to avoid
Even with the best intentions and a decent budget, futsal-court builds can go sideways fast. The most expensive errors usually come down to skipping specs, rushing the process, or misunderstanding the rules. Here’s what to watch out for, so you only build once, not twice.
1. Inaccurate court dimensions
It happens more often than you’d think: a court is built too short or too narrow, and it’s disqualified from hosting official matches.
Fix: Always double-check the space after subtracting for buffer zones. A 40 × 20 m court with 3 m of runoff on all sides actually needs a 46 × 26 m footprint.
2. Improper line widths and placement
Lines that are too thin, off-centre, or misaligned with the goal frame can void your certification. Some builders use basketball or volleyball templates by mistake.
Fix: Use official measurements and always paint lines 8 cm wide. Make sure the penalty-arc radius starts from the post, not from the inside edge of the goal.
3. Poor drainage on outdoor courts
A flat outdoor court may look great, until it rains. Without proper slope or drainage, water pools and ruins playability for hours (or days).
Fix: Build a 1 % slope in the slab and add side drains or French drains around the perimeter. Check water flow before laying the top surface.
4. Weak goal anchoring
A beautiful court with unanchored goals is a lawsuit waiting to happen. Even light frames can tip dangerously during aggressive play or dives.
Fix: Bolt frames securely or use sandbags/weights rated to your goal’s specs. Double-check stability before every game.
5. Using the wrong flooring
Some facilities lay down basketball or multi-purpose surfaces that are too slick or too hard for futsal. That leads to injuries, unpredictable bounces, and a poor playing experience.
Fix: Choose futsal-specific flooring with verified slip-resistance and shock-absorption metrics. Always ask suppliers for EN or ASTM certification.
6. Skipping ventilation and lighting specs
In indoor builds, poor air circulation can create slippery conditions. Dim lighting causes visibility issues, especially near corners.
Fix: Invest in proper airflow systems and confirm your lighting meets the required lux levels across the court, uniformly, not just at centre court.
7. Forgetting multi-use needs
Some courts are used for futsal, basketball, volleyball, and more. Overlapping lines and markings without colour-coding can confuse players and referees alike.
Fix: Use different colours for different sports, and always prioritise futsal lines with strong contrast and durability.
FAQ
1. How big is a futsal court?
A standard adult futsal court is 38–42 m long and 20–25 m wide.
FIFA allows a smaller range (25 × 16 m up) for local matches, but international fixtures must sit inside the 40 × 20 m sweet spot.
2. What are futsal court dimensions in feet?
The regulation size converts to roughly 125–138 ft long by 66–82 ft wide.
A TV-friendly 131 × 66 ft (40 × 20 m) rectangle keeps you legal in any senior tournament.
3. How wide are futsal court lines?
Every line on the court is 8 cm (about 3 in) wide and counts as part of the playing area.
Using the wrong width can get a brand-new court rejected during inspection.
4. Can I play futsal on a basketball court?
Yes, if the floor meets traction standards and you tape temporary futsal lines inside the key area.
Many schools run U-12 leagues on 28 × 15 m basketball floors, just adjust goal size and buffer zones.
5. What size are futsal goals?
Adult goals measure 3 m wide by 2 m high (9 ft 10 in × 6 ft 7 in).
Youth programs sometimes drop to 2.6 × 1.75 m frames, but senior competitions never vary.
6. How far is the futsal penalty spot?
The first penalty mark sits 6 m (19 ft 8 in) from the goal line; a second spot is 10 m (32 ft 10 in) away.
AMF rules use a 9 m second mark, so confirm your league handbook before you paint.
7. What flooring is best for an indoor futsal court?
Poured polyurethane and sprung hardwood are the top choices because they balance shock absorption and true ball bounce.
Modular tiles work too (especially for quick installs) but check they meet EN 14904 force-reduction tests.
8. How much runoff space do I need around the lines?
Leave at least 2 m for local play and 3 m for international matches on every side of the court.
Outdoor builds facing strong winds often extend the goal-line buffer to 4 m to stop long rebounds.
Cheers,
Friska 🐨
Read next: How much does it cost to build a tennis court in 2025?
