How to choose a tennis Racket? (Beginner’s guide)
Confused about which tennis racket to buy? Learn how to choose a tennis racket based on skill level, grip size, head size, and more. Perfect for beginners!
Source: Freepik
Walking into a sports store or browsing online for a tennis racket can feel… overwhelming. You’re faced with a wall of options, all promising power, control, spin, speed, and maybe even “elite performance” (whatever that means 😅).
But here’s the thing: choosing the right racket really does matter, especially if you’re just starting out or leveling up your game.
Think of your tennis racket like a dance partner. The wrong one? Clunky, hard to move with, and likely to step on your toes (or in this case, strain your arm). The right one? It’ll make the game feel easier, more natural, and, most importantly, more fun.
And no, it’s not about buying the flashiest or most expensive model.
It’s about picking a racket that matches your current skill level, your body, your playing style, and your goals.
Are you brand new to tennis and just trying it out on weekends?
Or are you taking lessons and aiming to get more competitive?
Your answer will totally change what kind of racket you should be looking at.
In this beginner’s guide, we’re going to break down everything you need to know, without getting lost in confusing tennis lingo.
We’ll cover head sizes, grip sizes, weight and balance (in a way that actually makes sense), and even how to try out rackets before buying one. You’ll also get a feel for which brands are trustworthy and how not to overspend if you’re on a budget.
By the end, you won’t just “sort of know” what to buy—you’ll feel confident walking into that store (or clicking that “add to cart” button) because you’ll know exactly what to look for.
I. Understanding racket head sizes
TL;DR: Bigger heads = more power & forgiveness. Smaller heads = more control & feel. Pick the one that matches your current swing and goals.
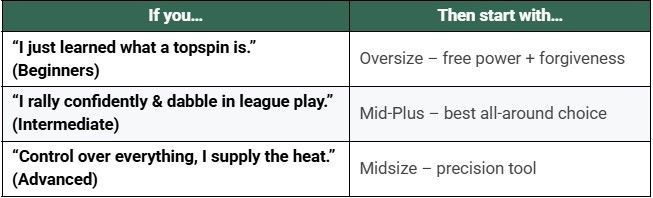
1. Oversize (105–115 sq in / 677–742 cm²)
Who loves it: Absolute beginners, casual hitters, and doubles players who crave easy depth.
Key benefits:
- Mega Sweet Spot → off-center hits still fly.
- Free Power → the frame does half the work, so you can focus on form.
Watch-outs: Slightly bulkier head makes quick net exchanges or wristy topspin flicks a tad slower.
Fan-favorite frames: Head Ti.S6, Babolat Boost Drive, Prince Textreme Warrior 110.
2. Mid-Plus (98–104 sq in / 632–670 cm²) — the “Goldilocks Zone”
Who loves it: Improving intermediates all the way to advanced all-court players.
Key benefits:
- Balance of Power & Control → roomy sweet spot without feeling like you’re swinging a frying pan.
- Versatility → handles baseline rallying, sharp volleys, and kick serves.
Watch-outs: Doesn’t hide sloppy footwork—so you’ll keep working on technique (that’s a good thing).
Fan-favorite frames: Wilson Clash 100, Babolat Pure Drive 100, Yonex EZONE 100.
3. Midsize (85–97 sq in / 548–626 cm²)
Who loves it: Advanced shot-makers who paint lines for fun and generate their own pace.
Key benefits:
- Laser Precision → compact head lets you pick corners like a GPS-guided missile.
- Pocketing Feel → you sense the ball linger on the strings, perfect for slicing and drop-shots.
Watch-outs: Smaller sweet spot punishes lazy footwork and late swings. Miss the center and you’ll feel it.
Fan-favorite frames: Wilson Pro Staff 97, Yonex VCORE 95, Head Prestige Tour.
Quick-pick cheat sheet
Tips:
- Demo two sizes side-by-side: Borrow an oversize and a mid-plus for back-to-back hits. Feel the sweet-spot difference in real time.
- Mind the net height: Oversize frames can pop the ball long if your swing is already loopy and fast. Adjust string tension (or your racquet choice).
- Future-proof yourself: On the fence? Go mid-plus. It grows with your skills, making upgrades way smoother later.
Head size is the first fork in the road, choose wisely, and the rest of your spec decisions (grip, weight, balance) fall into place like a clean inside-out forehand.
II. Choosing the right grip size
This section is your crash course on finding a handle that actually fits your hand. We’ll show you two lightning-fast ways to measure, decode those weird L1–L5 labels, and give you pro fixes if the size feels off once you hit the court.
TL;DR: A grip that’s too small forces you to squeeze harder (hello, forearm cramps), while a grip that’s too big kills wrist snap and touch shots. Get it right, and everything—from serves to drop volleys—feels easier.
1. How to measure hand in 30 seconds
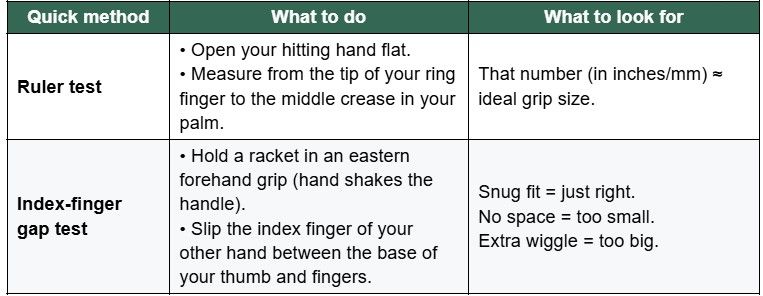
In a shop with no ruler? A credit card is about the same thickness as an index finger
2. Size chart cheat sheet
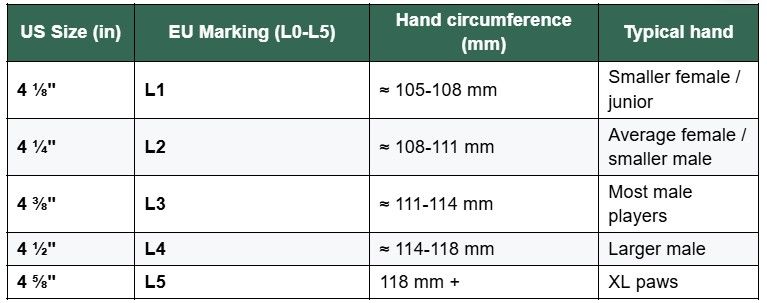
(L0 = 4" for young juniors.)
3. When you’re between sizes
- Go smaller. One overgrip adds ~1/16". Shaving a large handle down? Practically impossible.
- Sweaters, beware. If you burn through overgrips weekly, pick the smaller base size so the extra wrap doesn’t bulk it up too far.
4. Post-purchase feel checks
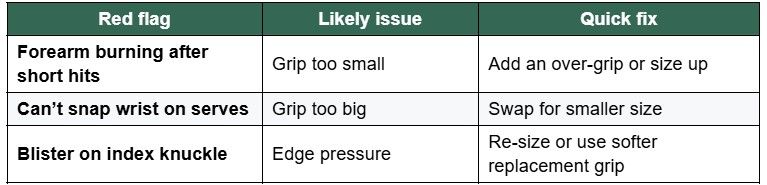
5. For juniors & still-growing hands
Re-measure every six months. Kids outgrow grips like sneakers, don’t let them play a whole season cramped.
III. Weight & balance
In plain English, “weight” decides how much oomph and stability your racket delivers, while “balance” tells you if that mass sits in the head or the handle.
Light + head-heavy = easy power.
Heavy + head-light = laser control.
Get these two specs dialed in and your swing suddenly feels… just right.
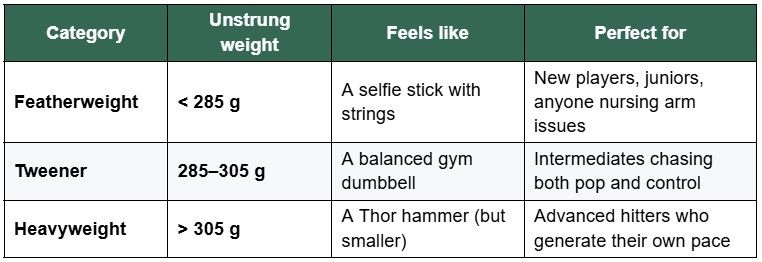
1. Racket weight 101
Tips:
- Lighter sticks whip through the air, but can flutter on big returns.
- Heavier frames plow through the ball, soaking up pace, yet demand stronger swing mechanics.
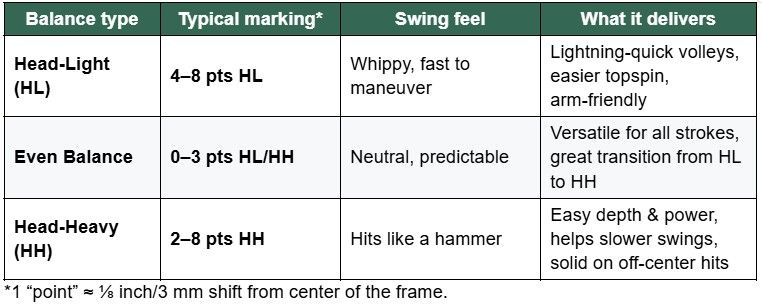
2. Balance (measured in “Points” or millimeters)
Rule of thumb:
- Head-Light = Easier to whip → better maneuverability, less strain on shoulder.
- Head-Heavy = More power on plow-through → great for effortless depth but slower at the net.
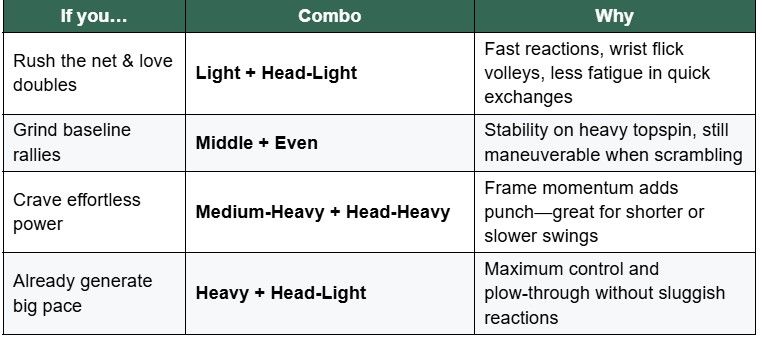
3. Combo cheat sheet
4. DIY tweaks (5-minute fixes)
- Add lead tape at 12 o’clock to bump power, or at 3 & 9 for stability.
- Bumper guard swap sheds a few grams if the head feels sluggish.
- Leather grip upgrade moves weight to the handle → instant head-light shift.
Tip: mod in small steps, 1 g of tape equals ~4 swingweight points.
5. On-court “feel” test
- Shadow-swing: Racket should accelerate naturally; no last-second muscling.
- Volley drill: If the head drops late, you’re too head-heavy (or too heavy overall).
- Baseline bash: Frame twists on heavy balls? Time to add weight or pick a stiffer stick.
IV. Racket length & string pattern
Length dictates reach and leverage, string pattern controls spin and precision. Tweak these two specs, and you’ll notice instant changes in power, spin, and court coverage, without swapping models entirely.
1. Racket length: Reach vs. maneuverability
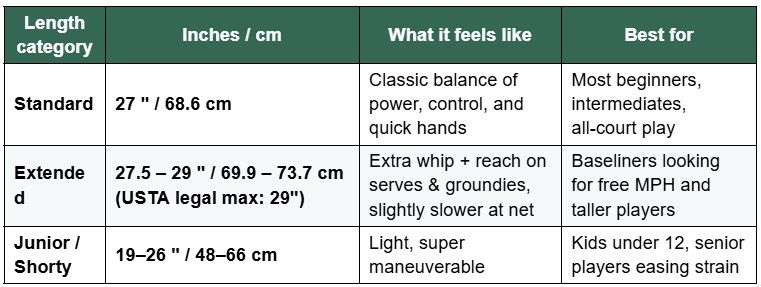
Quick take:
- Longer frame = more leverage → up to +5 % serve speed, deeper ground strokes.
- Shorter frame = ninja reflexes at the net and quicker directional changes.
Tip: If you struggle on volleys or have shoulder issues, stick to 27"; chase a booming serve? Try 27.5" first.
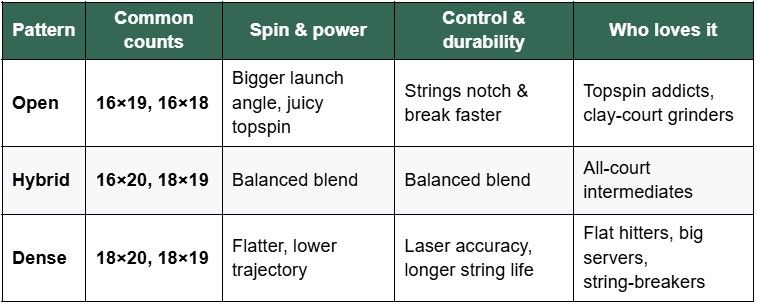
2. String pattern: Open vs. dense
Tips:
- Open patterns let the mains snap back like trampolines, gifting spin and a higher bounce.
- Dense beds keep the ball on the strings a split-second longer, handing you surgical placement plus durability.
- Hybrid patterns (e.g., 16×20) split the difference into a great “one-racket” solution.
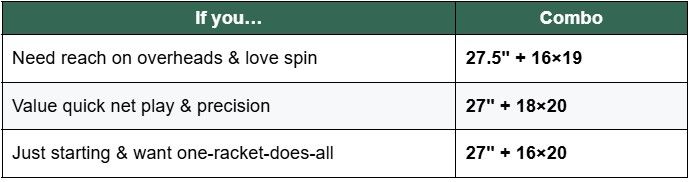
3. Combo cheat sheet
4. Shop-floor tests in 60 seconds
- Shadow-serve: Extended frame should whip without tugging your shoulder forward.
- String snap check: Rub finger across mains, wide gaps in an open pattern flex more. If you shred strings often, consider a denser grid or poly blend.
- Reach drill: Stretch for an imaginary wide volley. If your wrist twists to catch up, the extra length may be too much, drop back to standard.
V. Material & frame stiffness
The stuff inside your racket and how flexy, or rigid, it is decides two big things:
(1) How much free power you get.
(2) How kind it is to your arm.
Peek at the material mix, glance at the RA stiffness number, and you’ll know if that shiny frame will feel plush, crisp, or like a jackhammer after a two-hour rally.
1. What your racket is made of
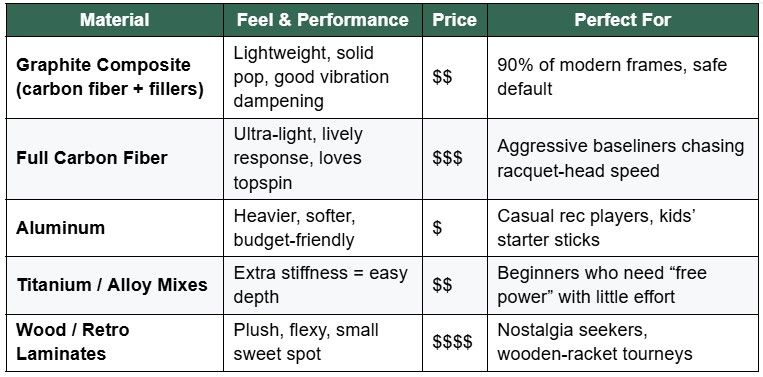
Tip: Most players thrive with graphite composites. Fancy fibers boost price more than they boost your win column.
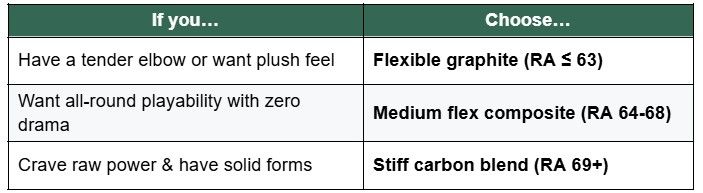
2. How stiff is the frame? (RA Rating explained)
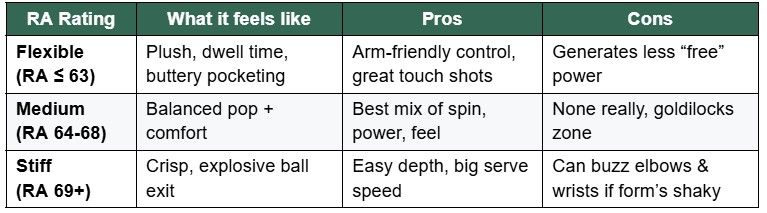
Tips: Lower RA → more flex → softer on joints.
Higher RA → frame barely flexes → bigger trampoline effect, but harsher feedback.
3. Built-in shock tech (marketing buzz-breaker)
- Foam-Filled Tubes (e.g., Wilson’s “FortyFive”) – softens impact without muting feel.
- Graphene, Basalt, Textreme Layers – exotic fibers that claim power and comfort. Read reviews—some tech works, some is a logo sticker.
- Butt-Cap & Handle Dampers – silicone inserts or gel sleeves that cut sting on off-center hits.
Tip: slap on a $2 rubber dampener first; sometimes that’s all you need.
4. DIY “ping” test
- Hold the throat, tap the strings with your palm.
- High, metallic ping → likely stiff.
- Deeper, muted thud → more flexible.
- Compare two frames back-to-back; your arm will guess right in seconds.
5. Cheat sheet
VI. Budget tips & trusted brands
1. Know when to buy new vs. used
✅ New racket:
- Full warranty, fresh strings, latest tech, no hidden damage.
- Best for: First-time buyers, players with arm issues, or those relying on specs and consistency.
♻️ Used racket:
- Great savings on discontinued models.
- Inspect for frame cracks, worn grommets, and check approximate weight/balance (ask or weigh).
- Best for: Budget-conscious players, collectors, or brand-loyal fans chasing older specs.
Tip: Even used rackets get fresh strings and new grip, factoring in $25–$40 gets you pretty close to new performance.
2. Price tiers: What you get for your money
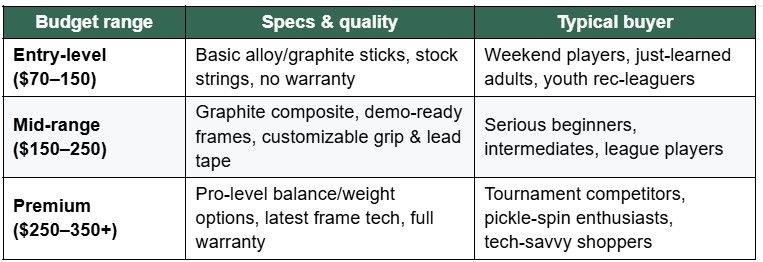
Tips:
- Always compare prices across major retailers. A $50–70 off mid-range frame shows up often during holiday promos.
- Wait for demo or last-year models—you’ll get most of the tech for 20–30% cheaper.
3. Trusted brands & what they’re great for
- Wilson: Classic versatility. Known for balanced performance and wide demo availability. Excellent for all-court styles and control-oriented players.
- Babolat: Built-in power and spin. Frames in this lineup help amplify strokes, making them great for players who love pace and topspin or are still building strength.
- Head: Known for comfort and maneuverability, often with more flexible frames and forgiving sweet spots. A strong pick for players who prize feel and all-court play.
- Yonex: Unique isometric head for bigger sweet spots and solid stability. Favored by net-rushers and touch-oriented players.
- Prince: Comfortable, oversize-friendly frames with extra plushness. A good match for newcomers or doubles players who want easy depth.
4. Secret hacks: Max value, minimum cash
- Bundle upgraded with strings & overgrips: Some shops toss in stringing and grips when you buy, which saves real dollars.
- Check demo sale sections: Pro shops often send lightly-used demo frames to clearance. Low hours on the clock = near-new feel.
- Use promo codes & student discounts: Many online retailers offer 10–20% off during back-to-school or holiday sales.
5. Brand pairing cheat sheet

Conclusion
Choosing a tennis racket isn’t about grabbing the flashiest model or the one your buddy swears by, it’s about how it feels for you.
Get the head size that matches your confidence, the grip that fits without pinch or wobble, the weight and balance your arm loves, the material that feels smooth, and a frame that grows with you. Try before you buy, tweak for feel, and care for it properly.
With the right racket in hand, every drill, rally and match will feel smoother, and way more fun.
Cheers,
Friska 🐨
.jpg)
